17 March 2018

SAFE Level One Lesson Plan - Part 4 of 5


This is part four of a five part series of lesson plans for the Situational Awareness For Everyone (S.A.F.E.) level one course I developed at SATAS Co. I believe those in the emergency preparedness community will find this very helpful. This course is designed to be meaningful to all citizens. You are free to review this material, you may even share this material - so long as links to the original material and credit are given to this author, me, V. Andrew McMillan of SATAS Co. www.SATAS4.me
Lesson Plan
Topic/Title: SAFE One Lesson 4/Threat Assessment
Presenter/Instructor: V. Andrew McMILLAN
Lesson Length: 20 Minutes
Required Resources:
Supplies/Reference Materials
Demo Items
Handouts
Projector/Blackboard/Whiteboard
Pens, Pencils & Stationery (PP&S)
Introduction:
Threat Assessment, this is theory being put into action. We will first review some of the current theories for programming your critical thinking, as well as, working through a decision making flow chart. We will discuss how our personal lens/filter alters and interprets what we see and how we perceive threats. Finally, we will explore some real world examples and discuss observation techniques for identifying threats before they are threats and how not to be deceived by those using role camouflage. Once we can identify threats we will be ready to advance to making response plans – which is the lesson after this one.
Main Topic:
Threat Assessment is the critical thinking process of taking what we observe, how we filter this information, come to recognize that we are in harm's way, and then know we need a plan.
Currently, USAF Colonel John BOYD is recognized as the first pioneer of taking gut reactions to a formalized plan. He was working on training air force pilots to survive dogfights with fighter jets during the Vietnam War. He created the OODA Loop or Boyd's Cycle:
(Link to Wikipedia - https://en.wikipedia.org/wiki/OODA_loop)
Observe – Orient – Decide – Act = OODA. The diagram on Wikipedia shows that this is more than just a single dimension loop, but an interactive feedback loop. Hard to draw but easy enough to understand once you have worked through it a couple of times. BOYD was working on a simple plan to program the pilots thinking process so they can make decisions faster and ultimately interrupt the OODA Loop of their adversary, thus winning the aerial dogfight.
Other organization also use formatted thinking to help leaders make the best decision in the time available. Anyone familiar with search & rescue operations will be familiar with SCORPA, an acronym for:
Size up the Situation
Contingencies
Objectives & Goals
Resources required
Plan
Action
Critical thinking is always a balancing act between the information available and the time allowed to make a decision. Whether flying a fight jet or driving at highway speeds, the time available will be less than a second or two. However, because of repeated practice exercises of what would I do if......you mind is already programmed to make those action happen when you need them. Some decisions however, you may get minutes or hours to devise a plan, and hopefully you will have more information/data to base your decision on. Just remember the most important phase is to actually action your plan. In situational awareness, failing to make a decision or failing to action your plan will both have consequences, usually negative. Making a decision and actioning a plan may also have negative consequences but this has to weighed against not doing anything and balanced against how much time or information was available at the time it was needed.
To help with this process, let's have a look at the Threat Assessment Flow Chart. (Insert full page illustration.)
T A Flow.jpg
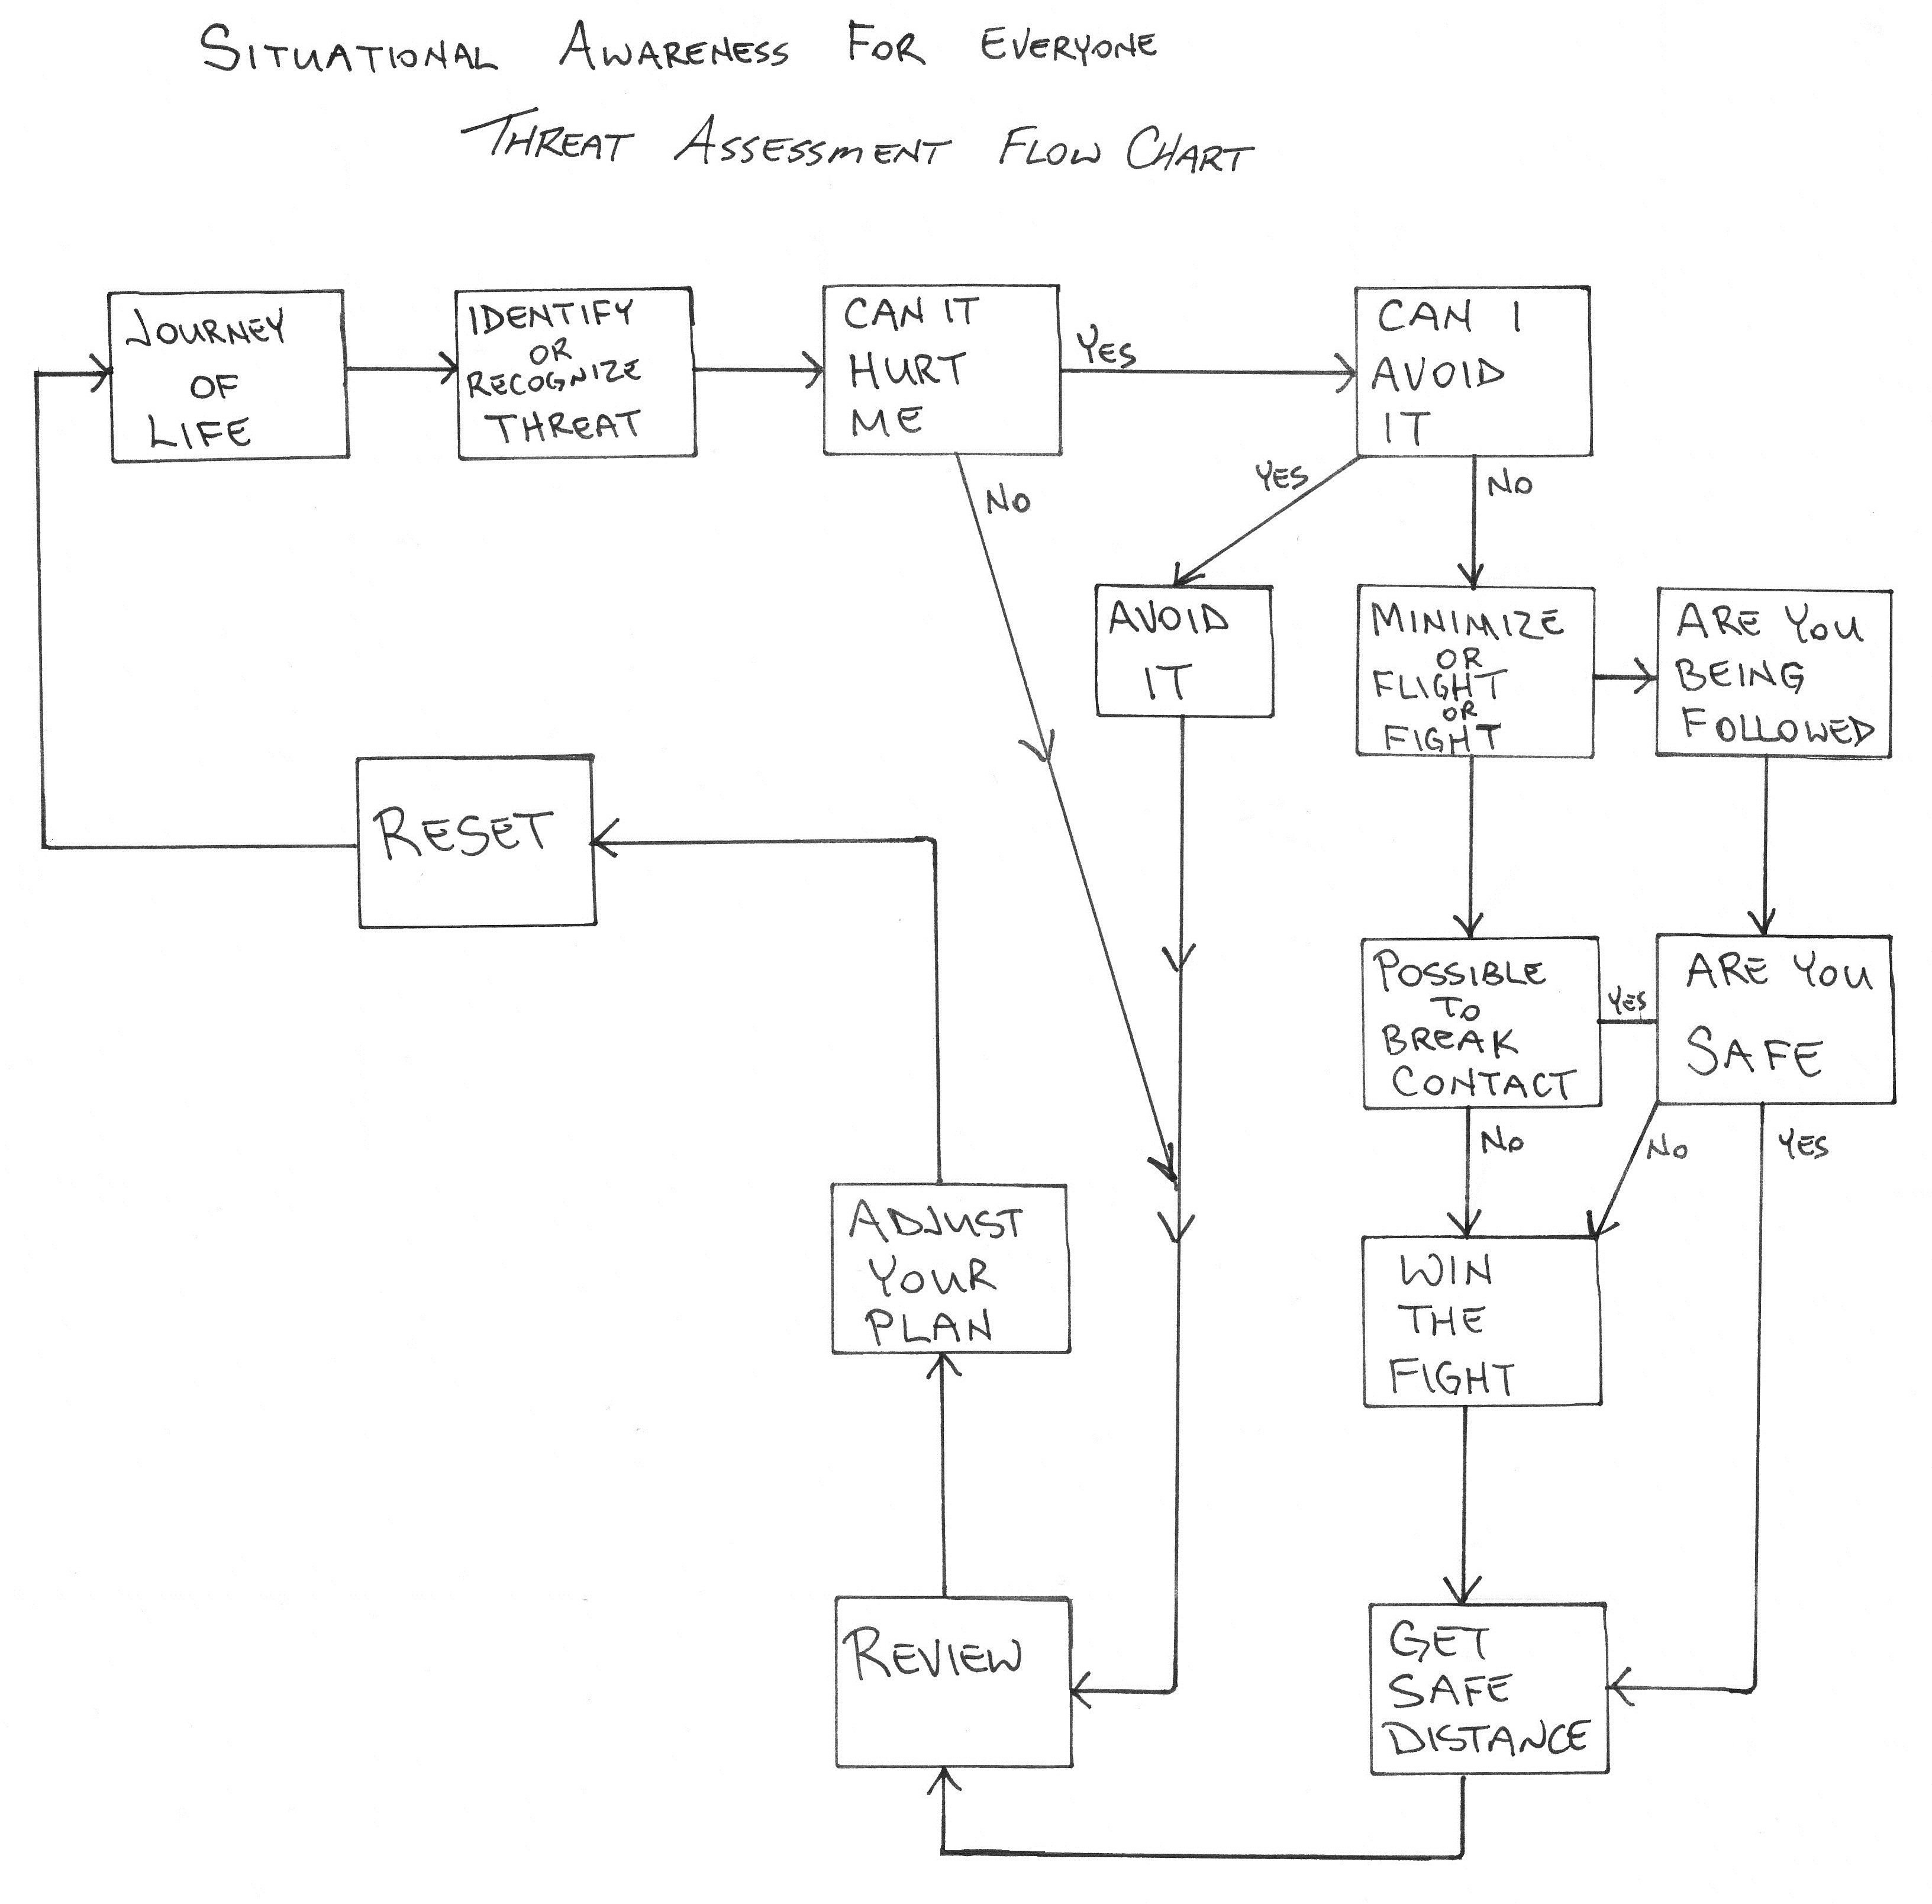
Thinking is not a pure linear process, so we will start with you enjoying your journey through life.
1.The first point is when we observe, identify or recognize a threat to our journey through life.
2.Next we have to quickly filter what we have identified – Can it hurt me? If no, we short cut to the review process. If it can hurt....
3.Can I avoid it? Yes, then avoid it – then short cut to the review process. If not......
4.Can I minimize the impact or damage? Can I escape? Are there any other options? If not primal programming will select “fight”.
5.If you can escape, are you being followed or pursued??
6.If you have to fight, can you break contact? Yes, then break contact. If not...
7.WIN THE FIGHT. If you escaped earlier and find your are not out of danger you too will be forced to win the fight.
8.Once you are safe or after winning the fight, you need to get a safe distance from the threat.
9.Review the incident – informally or formally. What did I do right. What did not work well. What can I do next time to achieve a better outcome.
10.Adjust your plan – internal or formal plan.
11.Now you have to reset your mind and be ready to enact your threat assessment again.
12.Continue on your journey through life. Be observant. Be ready.
This process happens hundreds to thousands of times a day, everyday. By programming your mind to make decisions in this manner, each time you experience a new situation you add to your knowledge library of responses and you know from previous outcomes what are you best first options to try. For those who are still young, you will have the option of learning from your mistakes or chose the path of wisdom and learn from those who have been through similar situations before you. Their experiences, if you take them to heart, will help speed up your learning curve.
Now that we have an understanding how we have our mind react. We need to spend a little time on developing our observation skills. It is by observing the world that we first learn that danger may be in our BUBBLE. We can all look at the world around us but how many of us truly see what is around us??
Observation is the process of taking in the information from our eyes, ears, nose/tongue & skin, filtering it through our BUBBLE and then making an impression on our mind. Thus, things we program into our mind to be “normal” can come back to harm us, when we do not recognize the threat because we overlooked an image because the pizza delivery man is not a threat. But was it really the pizza dude?? I will explain “Role Camouflage” in more depth in a moment.
So, who do we overlook on a daily basis?? The mailman?? Newspaper boy?? The lady who delivers the Chinese food?? The cable repair guy?? Taxi drivers?? Dry cleaner's delivery person?? How about construction crews?? First responders?? Would you notice if any of these people listed were the regular employee or an impostor?? Do you know your pizza delivery guy?? How about the paper boy?? How about your neighbours?? People who are normalized to us as “servants” are not really perceived. Period. When you want your pizza in 20 minutes or less, the pizza dude is damn important, but other than that....no attention is paid.
There is more to this than just people we expect to see. How about when in any retail shop, ever pay attention to how many people carry a knife in their front pocket?? Right pocket for right-handed or left pocket for left-handed, the easy tell is the metal pocket clip that is on the outside of the pocket. Never noticed, I am not surprised. Night clubs and bars, the bouncer or security staff usually disarm these folks before they get into a place that serves alcohol. Weapons and mind-altering substances is a poor mix.
How else can we protect ourselves.....ever left your mail in your car, just for a few minutes while you go into the store to buy some groceries?? Did you leave the mail face up so strangers can read your address?? Did you put your mail in the backseat where it is harder to be read?? Do you consciously pay attention to whether you leave your mail face up or face down?? Or do you keep your mail in a daypack when not in your vehicle?? How about your cellphone?? Do you use a password to lock the keypad?? Do you ever leave it unattended?? Do you ever talk on your cell while walking in public?? Have you heard of phone snatching??
Speaking of walking....going back to the article On Sheep, Wolves and Sheep Dogs; when the wolves are on the hunt they watch the flock. They focus on the lambs that do not take any precaution to protect themselves. Those who walk in crowds by keeping their eyes focused on the sidewalk a step or two in front and never look up....guess what the wolves have spotted you. Then they work themselves to a location to interfere with your path of travel. Then they force you off your path and take whatever they want. Now, back to observing. When you are walking in downtown Big City, if you keep your head up, and you look side-to-side and occasionally look behind you or look up at overpasses or down at underpasses; the wolves will see this and they will pass you by......the wolves know you are situationally aware and you are looking for hazards/threats. The wolves will avoid you, if they can find the helpless lambs who are easy kills.
Role Camouflage – is the active art of deception, by adopting those roles in Society that no one pays attention to – the janitor, pizza dude, cable guy, taxi driver, etc. As we discussed previously, these are occupations that are seen as below the people, however, they are necessary. As such, those who “borrow” these roles to mingle with neighbourhoods or to infiltrate buildings, when their actions are finished and the police investigate the witnesses will always say, “I saw a copy repair guy enter our floor. His visitor access pass was not working and he was needed to fix the copier on this floor and I let him into our office area.....” How was that employee to know that the copier had just been fixed in the morning?? Nor was that employee to know that they just granted access to their work area to an industrial spy?? If the employee was situational aware, they would have directed the copy repair guy to the security kiosk on the main floor or at the very least told the repair guy that it was a firing offense to allow unauthorized persons to by-pass security checkpoints. Those who are playing a “role” are very good at seeking sympathy from caring people to achieve their mission goals. They will lie. They will tell tall tales. They will use emotions against you. They manipulate people as part of their profession and they are very good at it. If something does not seem right, listen to you gut....something is probably wrong. Use your moral compass to guide your actions. This does not only happen at work/office. These “role” players can come to your home, too. Gas company. Electrical company. Cable company. Once they are in your home, who knows what their mission is & whom they work for, much less where you fit in. Situational awareness is “on” 24/7. The more often you are aware the easier it becomes.
Questions From Class (QFC):
Review:
In this lesson we have started to put our theory into action by observing and recognizing hazards and threats that are around us everyday, whether at work, at home or at play. We have been introduced to role camouflage and how that can be used against what we have programmed our minds to believe is “normal”. We have started to use the Threat Assessment Flow Chart to start programming our mind to filter and identify threats.
The Threat Assessment is only part one of a two part system. Part two will be your Response Plan.
Questions To Class (QTC):
Who do we not notice when walking downtown any city?? Street people?? Garbage man?? Couriers??
Summation:
You have been a good class. I believe you have quickly absorbed this material. I can see many of you have your eyes wide open now. You are hungry to learn more, specifically how do I deal with these things you just opened my eyes to see.
Your next lesson will continue with developing your Response Plan.
Thank you.
Your next lesson is with: ____________________________________________
Who will be discussing: ____________________________________________
At: ________ hrs, in the main lecture room. (or __________________________.)
Part five will follow in the next day or two. Thank you for reading. V.A.M.
Links to Parts One, Two & Three:

SAFE Level One Lesson Plan - Part 5 of 5


This is part five of a five part series of lesson plans for the Situational Awareness For Everyone (S.A.F.E.) level one course I developed at SATAS Co. I believe those in the emergency preparedness community will find this very helpful. This course is designed to be meaningful to all citizens. You are free to review this material, you may even share this material - so long as links to the original material and credit are given to this author, me, V. Andrew McMillan of SATAS Co. www.SATAS4.me
Lesson Plan
Topic/Title: SAFE 1 – Lesson Five/ Response Plan
Presenter/Instructor: V. Andrew McMILLAN
Lesson Length: 20 Minutes
Required Resources:
Supplies/Reference Materials
Demo Items
Handouts
Projector/Blackboard/Whiteboard
Pens, Pencils & Stationery (PP&S)
Introduction:
Once we can recognize threats, we need a multitude of response plans to have the greatest chance of defeating any identified threat. Like lighting a fire in a survival situation, you need to program your mind with multiple methods of responding to threats. Not all threats can be defeated by brute physical force alone. In fact, that is probably your last resort response plan....when all other plans fail.
Main Topic:
Our Response Plan wants to be layered and have a progressive scale of responses. Like securing an industrial complex, you want more than one layer defending your site.
A response plan is not linear or sequential. You do not have to go individually through all your layers to get to the response that the threat requires to respond properly. If the threat facing you requires a 5th level response and time/distance do not allow for escalation through the 1st to 4th levels, then you go from identifying the threat directly to a 5th level response, no regrets, no guilt, no shame. Whether the threat is a sinkhole on the highway or an armed mugger, time and distance may prevent you from a slower response cycle. That is life and if you wish to preserve yours, you may have to act quickly at times.
Your response plan is an action plan to get out of trouble(s). Many times this will be short term. However, having a response plan will allow you a quicker response time than someone who has not planned at all.
Response Plan Options:
1.Avoidance – If you don't have to be there, then don't.
2.Minimize – reduce your exposure and get away as soon as you can.
3.Flight – Runaway to a safe location. (Ensure to check that you are not followed or pursued.)
4.Fight – You may have to defend yourself. At the earliest possible time break contact and escape to a safe location.
5.WIN THE FIGHT!! If escape is not possible, win the fight. Use any & all means you have to defend yourself.
6.Get a safe distance. Re-Group, Re-Assess Threat, Re-Evaluate Options.
7.Review. Once you are safely away, review what worked, what didn't and what can I do better next time.
8.Update your response plan. What do you need to add. What should you delete. What options do you need.
9.RESET. You must let go of the last incident. Flip the switch & be prepared for the next challenge in your life. You cannot continually re-live/re-play the last incident. Re-Focus & Observe your world.
10.Continue your journey through life.
Once you have gone through an incident, whether avoiding a killer pothole on a urban roadway or just escaped a raging forest fire, you need to invest your time to review what happened, how your plan worked, note what didn't work or didn't work as well as you want and then make changes to your plan. The review process is first aid for your mental health, do not neglect your total health.
Next, because the challenges in life do not wait for you to be ready, you must quickly reset your mind to be looking for the next challenge to intersect your path on your journey through life. Do not dwell on the whatever it was that just happened. If you stop looking out for life's challenges you will be hit and blindsided. Stay vigilant.
To add depth to our action plan we also want to actively improve our success by being prepared, like a Boy Scout. There are many ways to pre-plan for challenges, the easiest to describe will be for wilderness or urban survival and then adapting those processes into all aspects of your life. The combination of skills and gear provide each of us with the most options to survive our daily lives, as well as, any life changing challenge that may be thrown at us by the Universe.
Let us start with first aid kits and bandaid packs. I expect all of you who do not have first aid training, will be seeking that training in the very near future. With minimal first aid training and readily available first aid supplies we can treat ourselves when we experience those minor injuries that seem to happen everyday in life. Without even minor supplies of clean dressings or antibiotic lotions a minor scratch could become infected and then it becomes a life threatening injury. So, with a basic first aid kit in each vehicle and at least one in every home, we will have the resources necessary to treat minor injuries, quickly and without any fuss. If you do any outdoor activities you will want to have a first aid kept in your rucksack or daypack , every time you depart for those activities.
Survival kits should also be considered in this same category. Get training. Practice. Get some experience using your skills. Build a kit with gear you know how to use. Survival training can start when children are 4 or 5 years old and get progressively more thorough as they get older. By 14 or 15 years old a child/youth should be able to survive a night without any adult assistance. If you cannot do this right now, add basic survival to your training to get list. You deserve to have these skills. You are worth it!!
After first aid and survival basics we come to a category called EDC – Every Day Carry items. These will be a blend of first aid and survival items. In some countries the items you can carry will also include firearms, however, here in Canada that is not an option most can do legally. EDC includes things like what is packed in our vehicle(s), what is in our jacket or parka, as well as, what is in the pockets of our jeans or in our purse. (Have items to display to class.)
Here are a few examples:
This Jacket shell – has most of the pockets pre-loaded with gear. The front cargo pockets contain: gloves, a toque, a balaclava, & headlamp. The arm pockets contain: a small signal mirror, cord, pen/pencil & Bic lighter.
This flight jacket – has gloves, toque, balaclava and headlamp in the inner hand pockets. The jacket also reverses from black to international orange to help being found. In the arm pocket there are: pens, Bic lighter, signal mirror and a mini-flashlight.
This parka – has gloves, a toque & scarf in the front cargo pockets. The chest pocket has a Ziploc bag with a notebook & pencil, as well as some cord.
These are like most jackets/coats in my closet. Each one is pre-packed with the bare minimum of gear. You never know when all you have time to do is grab a jacket before you run from your home or have to get away from a burning vehicle after a motor vehicle collision. This is as much about pre-planning as it is about programming your mind to be thinking ahead. I think about function and I am not concerned with fashion. Being stylish is fine, until it gets you killed. If fashion is a primary environment you must operate in, then we need to discuss how we can take the concepts presented in SAFE One and adapt them to a fashionable world. I believe you have the knowledge to make these adaptation if you really want to. Most days this means having function-based gear in your vehicle or at your office to augment or supplement your fashionable requirements with items that will help you get to safety if the necessity arises.
The Get Home Bag (GHB), is the item most used to keep the basics at work/in the office so you always have the gear you need. I, would also recommend keeping a GHB in each of your vehicles. The GHB only has enough gear and food stuffs to get you home. It is small, light and easy to carry. How far do you live from work?? How long would it take you to walk home??
What items should you carry??
Wallet – with cash, credit cards, identification
Keys – house, vehicle, storage locker
Fire – matches or a lighter
Knife – folding, locking blade – Gerber Paraframe
Light – flashlight or headlamp
Fold flat 500ml water bottle.
What is the minimum gear to get home??
Sturdy walking shoes or hiking boots
Socks – inner poly pro & outer wool
Weatherproof jacket
Sweater or fleece – for warmth
Hat – shade in warm weather & insulating in cool weather.
Mitts/Gloves – keep hands warm
Safety glasses – yellow lens type. Protect from flying debris.
Bandanna/Triangular bandage – sling or face cover if dusty.
2x 500 ml bottles of water
4x Energy bars or bags of nuts.
Other considerations when planning should include:
What if training/game??
Know the location of fire exits when in public buildings, malls, schools, etc.
Know the location of stairs. If the power goes out or there is a fire the elevators will not be safe to use.
Know where to seek help – security, police, EMS, fire.
Know the location of the AED or first aid kit. Know the symbols.
Know the location of fire fighting equipment – extinguisher, pull station, hose, or the fire axe.
Know how to call for help – cellphone, landline, payphone, CB radio, HAM radio, signal fires or ground-to-air signals.
Questions From Class (QFC):
Review:
In this lesson we have explored what we can do once we have identified a threat to our BUBBLE. We know we need an action plan that has multiple layers, so we can have options when we respond to a threat. We know sometimes we will need to act FAST!! We also explored some training and gear options to give our plan more depth. By pre-packing this gear and leaving it ready to go 24/7 we increase our chances at survival in the journey through life.
Questions To Class (QTC):
Name 5 things you can carry on your person everyday that will assist you if you ever need them?
Explain Get Home Bags? Where would you keep one?
Summation:
You have been an attentive class and I believe you all have shown a genuine interest in this lesson. You now have the foundation of knowledge to continue your journey through life as an situationally aware person. By building on this foundation you can only grow as a person.
Thank you.
Your next lesson is with: ____________________________________________
Who will be discussing: ____________________________________________
At: ________ hrs, in the main lecture room. (or __________________________.)
And to keep this to only five parts, the conclusion.
Lesson Plan
Topic/Title: SAFE One Conclusion/Summary
Presenter/Instructor: V. Andrew McMILLAN
Lesson Length: 10 Minutes
Required Resources:
Supplies/Reference Materials
Demo Items
Handouts
Projector/Blackboard/Whiteboard
Pens, Pencils & Stationery (PP&S)
Introduction:
Thank you for attending Situational Awareness For Everyone (SAFE) Level One. You have all received a great foundational understanding of situational awareness and how it can be used to impact all areas of your lives – whether at home, work or play. During times of crises or just everyday.
Main Topic:
I truly hope each and everyone of you have found this information to be of benefit to you. I also hope that you now see that being situationally aware can benefit you in all aspects of your life.
You all have a better understanding of your BUBBLE and at what range something becomes a threat to you. You have also worked through your personal response plans and have a working inventory of responses you can draw upon to get yourself out of trouble should you find yourself there.
You all know how important it is to review your plan after it has been tested by any event large or small, to improve your plan so it will work even better the next time it is required. You, also know, that you will be challenged often as you travel your path through this life.
Finally, we have explored some methods of pre-packaging gear and resources in common areas to always be ready for your use any time of day, any day of the year. We know that these preparations are very important to your personal survival in the event of an emergency occurring on short notice or during the middle of the night when you may not have time to pack even a few items before having to evacuate your home.
Before we wrap this up, are there any final questions from you?? Are there any areas you feel have not be covered in sufficient depth??
Questions From Class (QFC):
Review:
Nil
Questions To Class (QTC):
Summation:
In closing, I would like to thank you again for taking SAFE Level One. This is just the beginning. If you chose to pursue this further we have two more levels to this program: SAFE Level Two – Family Situational Awareness & SAFE Level Three – Community Situational Awareness.
You have been a great group to work with. You ask awesome questions, and I hope you will continue down this path. The skills you have learned here in this program will be transferable to all aspects of your life, as well as, to any other training you do – whether that is martial arts training or business programs. Being situational aware is being aware of what is happening around you, at all times, in all places. Once this door is opened it is hard to close. It is difficult to go back to a state of unknowing.
Your certificates will be mailed to those who have provided a shipping address. The rest of you, your certificates will be ready for pick-up next week on Thursday.
That's it folks. I hope at least one person out there found this course material educational or at least entertaining. I will review the response to posting lesson plans and then decide if I will publish more in the future. If you enjoyed this material and feel inclined, please send me some feedback in the comments section.
Take care & stay aware,
V. Andrew McMILLAN.
Links to Parts One, Two, Three & Four:

I hope everyone has enjoyed these lesson plans.
V.A.M.

28 January 2018

Tactical Shotgun Vest - Part Two Update

Tactical Shotgun Vest Designed by SATAS Co
MTM Case-Gard Shell Stack 12 Ga Shell Holder
Close Up of Shell Stack in 25 Round Pocket
This will be the first update as this project is a work in progress. Since the start of the year a few more items have arrived. Here is the link to part one: tactical-shotgun-vest-part-one

Thanks to Ash G., for pointing me in the right direction, I now have a replacement for carrying bulk 12 Ga in the vest without worrying about cardboard boxes dissolving in the rain. Ash is a shotgun expert and I knew he would know if a plastic alternative was available.

Please, allow me to introduce the Shell Stack by MTM Case-Gard. These are plastic inserts for carrying 25 rounds of 12 Ga. Their original purpose is for competition shotgunning at the club shooting skeet or trap. These lightweight plastic inserts are tough and the same size as a cardboard box.  Now, you may be able to understand my excitement as I want these for a tactical purpose. This small box keeps 25 rounds organized and ready to go. Now reloading the vest can be even quicker....I will touch on this a bit more a little later. Suffice to say, I am pleased with this upgrade for the tactical shotgun vest.
Close Up of Signal Smoke Pouches
Combat Tourniquet Mounted on Top of Medical Pouch

Combat TQ from Amazon.ca (similar to C.A.T.)
Tactical Ammo Resupply - Plano + Shell Stack = 100 Rounds


As you can see in the photo, the Shell Stack fits nicely in the pocket. So, in my application of tactics on this vest, the shell loops will be used to supply tactical and administrative reloads of the shotgun. Once the loops are depleted, then they will be reloaded from the bulk ammo in the Shell Stack.

If you were to get caught in an urban warfare situation with a prolonged contact with hostiles, the bulk pocket has a hook & loop tear-away strip at the back of the flap to aid in rapid access to the contents. Since, fine motor skills to undo the side release buckle may be impaired by an adrenaline dump. 


This next photo shows another angle of the Signal Smoke Pouches. You just never know when smoke may come in handy.

The vest holds two Enola Gaye EG40 signal smoke grenades. These should be enough for confirming location if an evac by air ambulance is required. They are reasonably priced at around $13 each. 

So, the left side of the vest can carry 52 rounds of 12 Ga and two smoke grenades. 


The right side of the vest is slowly coming together, too. My order from Amazon.ca arrived the other day, now I have a combat tourniquet. Very popular piece of kit for anyone who participates in any shooting sport or occupation. 

This is a Chinese copy of the C.A.T. Tourniquet. (If you need the real C.A.T.: http://ctoms.ca/) From Amazon this copy is about $14 the real C.A.T. Gen 7 is $39. I will make this TQ work until I can afford to upgrade.

My medical kit is a work in progress. When complete it will be setup to handle minor injuries, as well as, injuries that can occur with firearms use. A micro CPR shield and Wound Seal will be part of my kit. I will do an update in the near future once the med kit is ready to go. For now the TQ is mounted on the top of the med pocket, ready for use.


Before we sign off, I would like to revisit the Shell Stack as part of the tactical ammo resupply. The Shell Stacks I found on Amazon.ca were about $15 for  a four pack. Now, if we team up the Shell Stack with a Plano Shot Shell Box we can easily carry 100 rounds of 12 Ga, enough to reload vest's bulk pocket four times. The Plano box is lockable and compact, making it easy to keep it handy.

That's it for this update. Thanks for reading.

Until next time.......remember, tactical shotgunning and competition shotgunning are not the same. 

Mountainman.

Snowshoe Harness for Military Surplus Snowshoes

Improved Snowshoe Harness Style #2 - Designed Jan 2015

Close up Inside Left Snowshoe
I know a few of you out there have purchased these military surplus snowshoes and why not the price is right. I got mine from Sportsman's Guide for $39.99 USD a set. The crappy web harnesses that came with them were not field ready in my opinion. So, I made my own. 

The first harnesses I built were fine for snowshoeing around the prairies or gently rolling hills, however, my son & I were on a snowshoe trip in the mountains and my basic snowshoe harness design did NOT cut it. Not enough tail/heel control on steep uphills. We worked too hard on that trip.
Close Up Outside Left Snowshoe
 So, on our return I designed and made two sets of Improved Snowshoe Harnesses - Style #2. These are the harnesses in these photos. Now, we had a harness that could hold the heel tight and provided better tail control. Now, by design these military snowshoes are not setup to perform like Sherpas or other modern snowshoes you can get from Canadian Tire, Mountain Equipment Co-op, Atmosphere or other outdoor shops......then, again these snowshoes do not cost $200+ a set.

The military surplus snowshoes were designed for the Boreal Forest and the high Arctic, they are a tough-as-nails version of the classic snowshoes used by natives across Canada from the beginning of time. The magnesium frame does not warp like wood and does not need to be re-vanished, either. The metal cable lacing rarely breaks like rawhide lacing and again does not require re-varnishing. In an emergency you can shave off some of the frame to use as a fire starter. But, these snowshoes are not technical snowshoes for hiking in the mountains. There are no metal harnesses and no crampons/ice cleats. Yes, there are some ridges on the bottom for traction on crusty snow but they are not designed to hold on ice.

I have included the designs for making your own snowshoe harnesses at the bottom of this post. I prefer to have my buckle that opens to be on the outside of my foot/boot, helps me to remember which snowshoe goes on which foot. For materials I used a 10 ounce vinyl for the toe and heel pieces and poly-pro webbing for the straps and normal nylon plastic buckles from PacCana (supplier in Calgary).

I hope this helps.

Until next time......buy surplus and then improve or modify!

Mountainman.

Style #2 Improved Snowshoe Harness
Style #2 Improved Snowshoe Harness Pattern - Jan 2015

Basic Snowshoe Harness - Feb 2003

Style #1 Improved Snowshoe Harness - Jan 2015

01 January 2018

Tactical Shotgun Vest - Designed & Prototyped by SATAS Co - Part One

Tactical Shotgun Vest Designed & Prototyped by SATAS Co
Tactical Shotgun Vest - Prototype by SATAS Co
First post of the New Year. Welcome 2018.

Spent better part of three days designing and building this prototype Tactical Shotgun Vest. Unlike, other vests out there this is a mission specific shotgunner vest. Shotgun loops will hold 27 rounds and below them is a pocket that will hold a standard 25 round box of 2 3/4" 12 gauge or multiple 5 round boxes of slugs or buckshot. 

To aid in signaling there are two signal smoke grenade pouches beside the 25 round pocket.

The opposite side of the vest are pouches for a first aid/IFAK kit, pockets for a folding knife (Gerber Paraframe) and a multi-tool (Fuller 15-in-1) and a small pouch for more slugs or cleaning kit. This prototype is still a work in progress, I will add more photos and the design pages later.

Until next time......if you can't find it, make it!

Mountainman.


24 December 2017

Old World Effectiveness - Single Candle Holders

Single Candle Holder in Glass Vase
Well touring Scotland in 2017 we happened upon a small roadside cafe and gift shop, (Goodbrand & Ross Tearoom on the A939. www.goodbrandandross.co.uk.) In this shop we purchased three single candle holders. The shop was on the way back from visiting Corgarff Castle.

The simplicity of this design appealed to our taste. I, also thought of local craftsmen/women in our part of the world who could understand this design and craft their own version for local markets.

The single candle holders cost us 2.50 GBP (Great Britain Pounds) and once home we purchased the glassware for $3.00 each and the candles were $1.25 for five candles. So, to have one operational unit would cost about $10. A fair price for light on a Winter's eve.

I will include a few photos and close ups for those who work metal. 

Merry Christmas All!!

Mountainman.

Sideview of Candle Holder

Detailed Sideview of the Three

Dollar Store Candles $1.25

Should Be Sheltered Once The Flame is Below The Rim

Three in a Row