27 May 2021

Tool Roll Designed by SATAS Co for Craftsman Ratchet Set


Campout 2021 (Photo by V.A. McMillan)

Ever have one of those projects you have been meaning to tackle and you keep putting it off?? Well, today ends the procrastination on one such project. My old Craftsman ratchet set was living in the plastic case it originally came in...well, eventually plastic breaks.


Thankfully, I have time to focus my energy on finding a solution to this broken case and get these tools back in the truck where they belong. The first step was to draw a sketch of a possible solution. Like this:


The original thought was to use a zipper closing case, that was similar in layout to the old, broken plastic case. However, when getting setup today, a new idea emerged...


A classic tool roll. I have made a few of these in the past for wrench sets. So, now we just needed to adapt the design to fit this specific Craftsman set.


Now, with a basic idea, it was time to take this project from concept to reality. First step, use the actual tools to create the actual layout of the tool roll. This is a good start.

After an hour or so...everything is coming together nicely.


This is a successful tool roll that holds and protects the tools, but also rolls up more compact than the old plastic case. A very win-win solution.

Fold Flaps

Roll Up...Mind the Flaps

Secure the Buckle

Another day and another project completed. One step closer to being ready for another trip to the mountains.

Until next time...if it breaks, find a solution.

Or better yet, make a solution!


Mountainman.


26 May 2021

VIAIR 88P 12v Portable Air Compressor Custom Travel Tote Designed by SATAS Co


Campout, April 2021 (Photo by V.A. McMillan)

The VIAIR 88P portable 12-volt air compressor is a handy piece of gear, especially if you drive routes that take you off paved roads. Of course, having a portable air compressor to top up tires even when traveling the blacktop is also quite convenient. 

This compressor unit was a gift and came from Amazon, checkout my review (https://www.amazon.ca/gp/customer-reviews/R1HPSAMZ2C94SM/ref=cm_cr_dp_d_rvw_ttl?ie=UTF8&ASIN=B005ASY23I). I am impressed with this little unit, considerably more useful than my last 12-volt air pump. 

There are two things I would change, if the design team at VIAIR were to give me a call. 1) This air compressor would be even better if it had a 1/4" quick connect. Then any 1/4" air hose with the proper 1/4" quick connect fitting would be usable, thus making replacement in the years to come much easier for the end user. 

2) The 88P deserves a beefier travel bag. The one that comes with it is well made, however it is too tight for frequent use. Because the bag is so tight, I fear the air hose has unnecessary pressure placed on it right where it connects to the compressor. This is a poor design in my opinion. 

To solve this issue SATAS Co. has designed a prototype travel tote for the VIAIR 88P 12-volt portable air compressor.

Original VIAIR Tote and the New SATAS Co Prototype

As you can see in the photo above, the original VIAIR tote is a compact package. It is around 10" long by 5" wide and almost 6 1/2" tall. In contrast, the SATAS Co prototype Travel Tote is 13" long by 6" wide and over 7" tall. Further, the prototype uses felted fibre padding to protect the air compressor from minor bumps while in transit on gravel roads.

Here is a closeup shot of the top of the compressor:


The air hose connects just below the air pressure gauge. You will notice the power cable has plenty of space at the bottom of the Travel Tote.


The Travel Tote allows the air hose to be loosely coiled inside placing minimal stress on the hose mounting point on the compressor.


The air hose is long enough to reach from the rad area of a 1998 Tahoe to either back tire. The power cable is heavy enough to survive filling a tire without overheating and the clamps are sturdy and grip the battery posts without having to worry if they will slip off before your inflation job is complete.


One last upgrade is the under lid storage pouch and pen/tire gauge pocket. The pen pocket was made from fuzzy (loop) Velcro type material, so you can stick extra stuff on, if needed. The pouch has a small Velcro type closure to keep accessories inside. 

If you need a Travel Tote for your VIAIR 88P portable compressor here are the basic plans that were used to create the prototype:


Maybe the folks at VIAIR will reach out and want to chat about making a custom Travel Tote for the VIAIR 88P 12-volt portable air compressor. 

Until next time...If you find an issue with your new gear, then find a solution!!

Mountainman.


08 May 2021

Canada First Model for National Defence: Naval Assets


L'Anse aux Meadows, Nfld (Photo by V.A. McMillan 17 Jul 2012)

A short while ago, I started this discussion with adjusting the Canadian Forces High Command from a Political Patronage Model to the Canada First Model. (You can find that post here: https://mtnmanblog.blogspot.com/2021/04/future-cf-structure-from-partisan.html). Further, all new Canadian submarines should employ the tethered drone antenna system I suggested previously (https://mtnmanblog.blogspot.com/2021/04/design-idea-tethered-drone-antenna-for.html).

Moving forward, with the Canada First Model for long-term strategic planning for the defence of Canada that is immune to petty political interference and intrigues. The first big leap has to be based on planning that looks at the service life of each piece of equipment necessary for the defence of Canada and then ensuring there will always be a ready supply to replace units that are reaching the end of their service life. This can also be a thread to explore later, of the process to have frontline equipment, second line equipment and third line equipment, before retiring said equipment from service.

The exploration of a Canada First Model for National Defence will begin with a look at our Naval assets. I will skip a review of our current assets, that information is available somewhere on the world wide web. I will focus on developing a list of naval assets that should be produced by Canadian manufacturers in direct support of the Canadian Forces.

If the current economic situation requires the government of the day to spend trillions of dollars of borrowed money, by God, there better be something to show for that debt at the end of this nightmare other than the total enslavement of the Canadian people. One possible solution is to borrow to invest in defending Canada and by extension re-building Canadian industry from coast-to-coast-to-coast!

Even one trillion dollars focused towards rebuilding the Canadian Navy would go an awfully long way to putting Canadians back to work, strengthening the defence of the Canadian coastline, which is the longest in the world – according to online sources; and revitalizing Canadian shipbuilding yards on the Pacific coast, Atlantic Coast and on the shores of the Great lakes. With this in mind, ships should be scaled to make the most of our local builders.

Unlike the political patronage model, where only one or two shipyards are building ships and the rest are starving for work and contracts, the whole point of a Canada First Model, would be to ensure the widest possible spread of sustainable manufacturing across the country. Those in other manufacturing industries fear not,  future blog posts will explore land-based equipment and armaments, as well as air assets. The Canada First Model will be a systems approach to ensure harmony of production towards a common goal - defence of Canada, through Canadian innovation, industry, and employment.

Let’s look at some details…


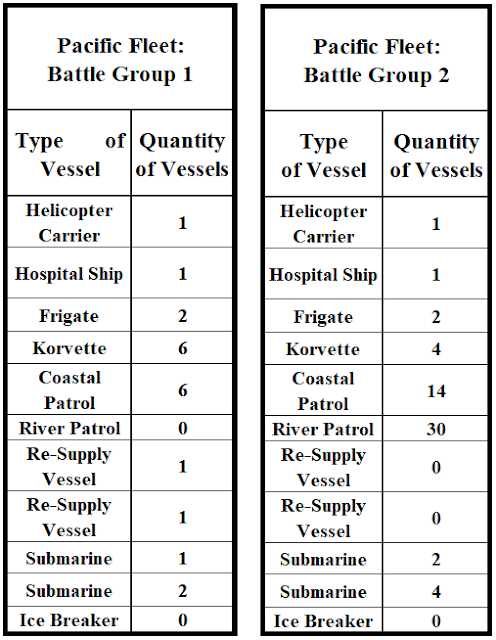
The proposed naval fleet composition will be based on a Helicopter Carrier and Hospital Ship group. For defence of Canada, aid to civil powers in the event of a major disaster, and/or aiding our NATO or NORAD allies this combination of naval and air assets would make Canada a better ally than current contribution which are strangled by political interference.

Looking at each fleet, starting with the Pacific Fleet:


Battle Group 1: will be Canada’s contribution to blue water patrolling of Canadian territorial waters and be the assets for foreign deployments around the Pacific to aid our allies.

Battle Group 2: will be primarily for the defence of Canada’s Pacific coastline; as well as, training Naval Primary Reserve Units.

Next, is the Atlantic Fleet:


Battle Group 1: will be Canada’s contribution to aiding our NATO partners and blue water patrolling of Canadian territorial waters.

Battle Group 2: will primarily focus on coastline patrol and training Naval Primary Reserve Units.

The Arctic Fleet:

The Arctic Fleet will have two missions. The primary mission is to conduct surveillance of the North-West Passage and sub-surface surveillance of Canadian territorial waters. The secondary mission is to ensure connectivity between Northern Communities in the Yukon, Northwest Territories, and Nunavut.

Finally, the Great Lakes Fleet:


The Great Lakes Fleet would be broken down to Patrol Groups on Lakes Superior, Huron, Eire, and Ontario. This would increase Canadian presence on these bodies of water to ensure sovereignty and border integrity via water routes to land access points. Further, the addition of a Hospital Ship on Lake Ontario would be a giant step forward for emergency preparedness in the event of a disaster in the Greater Toronto Area.

Parting shot…in closing this post, I would like to briefly touch on adding a few strategic naval bases to support this expanded Canadian Navy.


The Pacific Coast would maintain its current bases at Esquimalt and Nanoose Bay. A new facility would be needed at Port Rupert or somewhere nearby. Further, a series of coastal outposts would be a smart move to allow the Coastal Patrol vessels and River Patrol boats a place to make contact with locals, re-supply/refuel, and gather intel.

The Atlantic Fleet would improve current facilities at Halifax and St. John’s. Like in the Pacific, a series of coastal outposts would be the right approach to networking with the locals and improving communication exchanges. A submarine harbour near Goose Bay would be something to consider.

The Arctic Fleet would need new facilities at Tuktoyaktuk, Iqaluit, near Sanikiluaq, and near Akimiski Island. Further, protecting in the inner North-West Passage by establishing surveillance beds for Stalker Class submarines would be a good idea. Finally, having the Polar 8 Ice Breakers in the region would aid rescue missions for ships or aircraft stranded in or on the ice.

This has become a bit long for a blog post, so I will end it there for today.

So, until next time…write your plans down and share them!

Mountainman.


04 May 2021

Improving the Amazon Basic Vehicle Tablet Mount - Fit Tablet in a Protective Case


Mount Livingstone, Alberta (Photo by V.A. McMillan, 2020)

Do you need to mount a tablet that is in a protective case into your vehicle?? Are you planning to use the Amazon Basic Vehicle Tablet Mount?? Are you concerned reviews state the mount will not work with tablets in a protective case?? Looking for a solution??

This blog post is to solve the issues described above. Use the Amazon Basic Vehicle Tablet Mount (https://www.amazon.ca/gp/product/B07RD8B8ZB/) and modify it to work with a tablet in a protective case. 

Caveat - the solution I will propose will work best if you are looking for using your tablet when the vehicle is stationary. I did not create this solution to solve using a tablet in a protective case while the vehicle is in motion, this will likely work; however, you will have to use your own deductive investigating skills to prove that this solution works for that need as well.

Let's start by looking at the Amazon Basic Vehicle Tablet Mount:


First, the quality of this mount is quite good and uses a blend of metal and plastic materials. Further, there are plenty of adjustments for both anchoring to a post and adjusting screen viewing angle of the tablet when mounted.

The challenge with this tablet mount is the spacing between the nubs and the frame is too narrow to hold a tablet in a protective case. See below.

The mounting nub before modification

The mounting nub after modification

The following tools and supplies will be required to perform the modification:
1x Hand Saw

1x Flat File

1x Robertson Screwdriver

1x 10 mm wrench or socket & ratchet

4x 1 1/4" x #10-24 Machine Screws

4x #10 Flat Washers

4x #10-24 Nyloc Nuts

8x 1/4 S Flat Faucet Washers - Rubber

Step One:

Cut off the four (4) plastic mounting nubs.


Step Two:

Re-assemble. File plastic nub cut area flat, if needed. Using the #10-24 x 1 1/4" machine screw, thread from nub towards frame, add 2x 1/4 S rubber washers, push assembly through frame. Add #10 flat washer (outside of frame), and secure together with the #10-24 Nyloc nut.


Step Three:

Using a #2 Robertson screwdriver and a 10mm wrench, snug the whole assembly together until the threads from the machine screw just pass the nylon of the nut. See below.


Step Four:

Install the modified bracket into your vehicle, anchoring to one of the headrest posts. Once you are happy with the anchor location, tighten the large thumbscrew. See below.


Step Five:

Finally, install your tablet into your new vehicle tablet mount. As I stated earlier, I do not need my tablet to be mounted while the vehicle is in motion, thus, I am using the mount top and bottom, not corner to corner. See below.


This entire project took less than two-hours including going shopping at the local hardware store for the machine screws and other parts. The actual modifying took less than an hour, while carefully using a handsaw to make those vital cuts to remove the plastic nubs. I do not have a fancy shop, so this had to be completed on my front deck, without power tools. 

For those who may attempt this modification, knowing exactly what hardware is required and how many should speed up and economize your project. 

Total cost: $29.95

Amazon Bracket: $17.20

Hardware: $12.75 (2.99+2.99+2.79+1.99+1.99) 

I am sure if your hardware store sells #10 machine screws and parts individually, your costs will be lower. Many of these packages had more screws, washers, and nuts than were needed for the project.

Until next time...If you see what you need, but it needs modifying to work, then modify it!

Mountainman.